Texas Tree Tips: December 2014
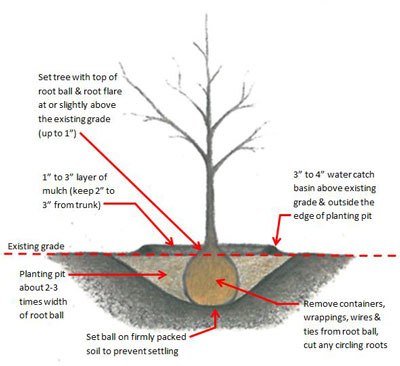
Planting graphic by RuthAnn Jackson, Arborilogical Services.
by Steve Houser
Tree Planting, Part 3 – Planting a Tree
To plant a tree is good. To ensure its survival is golden. Even if you hire a contractor to plant a tree, it is important that it be done correctly to protect your investment. Proper planting and follow-up care help to ensure your tree will survive, prosper, and provide maximum benefits for many years to come. Take the time to do it right. Your grandchildren, as well as a horde of squirrels, will be quite pleased.
Assuming you arrived home to plant your tree without roasting the foliage in the wind, it’s time to gently lower your new tree to the ground without damaging the root ball, trunk, and limbs. Most trees with medium to small root balls or containers can be moved by grabbing the container or root ball and tilting them on their side and gently rolling them to the planting hole. The trunk should never be used as a handle to rotate, position, or lift a tree. Larger trees may require a dolly or “ball-cart” to move them to the planting site.
If a planting site ever stands in water after heavy rains or frequent waterings, it is wise to dig a test hole the depth of the tree’s root ball and fill it with water. If the water stands in the hole for more than a few minutes, you may need to plant a tree species that will tolerate wet conditions.
Dig the hole to a diameter of about two to three times the width of the container or root ball. The sides can be sloped inward and roughened up if the existing soils are clay. Clay soils tend to get compacted, so roughing up the sides of the hole helps to offset the compaction that occurs when digging the planting hole. Measure the height of the root ball or the height of the soil in the container and dig the hole no deeper than this measurement. If you find that you are an overachiever and have dug the hole too deep, place soil back into the hole and stomp on it until it is hard and compacted. (Compacted soil under the root ball is not an issue.) Skip this step, and the tree will sink below the existing grade after it is planted. The root flare, or root collar, is that area of transition where trunk converts to roots. This area should always be at or slightly above the existing grade. Too low, won’t grow; too high can kill the guy.
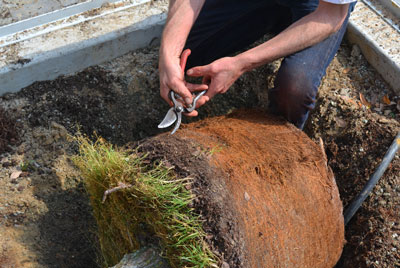
When the roots of a container-grown tree have started to grow around the sides of the container, sever them from top to bottom in several places to help initiate new root growth away from the trunk and reduce the likelihood of girdling roots. Photos by Bill Seaman.
If the tree is container grown, cut the roots hanging out of the holes in the bottom (if any), and carefully lay the tree over on its side. Reach into the container and pull out the tree by the roots — not by pulling on the trunk. You may notice roots circling the outside of the exposed root ball, or crossing roots on the bottom. If they are not severely tangled and are small in diameter (under a quarter of an inch), the roots can be pulled outward to encourage them to grow at a 90-degree angle from the trunk once the tree is placed in the hole.
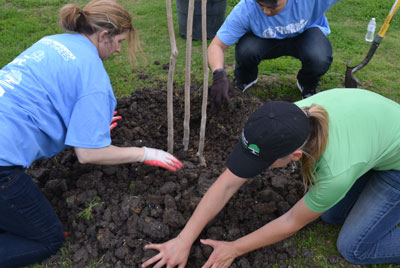
The balled-and-burlapped (B&B) tree, as well as the container tree, should be carefully rolled into the hole, sliding it down the sides until it rests in the bottom. If there are large circling roots that are tangled and cannot be bent outward, the outside roots should be cut with hand clippers from the top of the root ball to the bottom on four sides. B&B trees should have all twine, rope, and wire removed.
Use the extra soil to build a watering ring around the outside edge of the planting hole. The ring will help hold the water over the root ball as the new tree becomes established.
Be sure the tree is positioned correctly before you backfill using the native soil. Remove any larger rocks and break up larger clods of soil. Fill the hole with soil halfway and tamp it down; then fill the hole with water at low pressure. After the water drains, fill the remainder of the hole, and use excess soil to build a ring around the outside edge of the root ball. Add 1 to 3 inches of mulch, but do not allow soil or mulch to cover the root flare. Soak the root ball with low-pressure water until it is completely saturated.
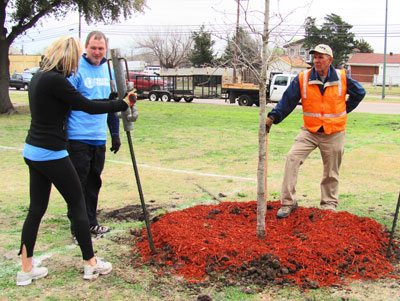
Almost-complete tree planting with staking being installed. The mulch was pulled back around the base upon completion by Eric the Conqueror. Eric Larner (in the orange vest) is a Texas Master Gardener with Dallas County and a Citizen Forester.
Stake the tree if necessary. Find details in this prior article.
Trunk wrapping should be used only on smooth-barked trees that originally grew in an environment where the canopies shaded the trunks. The purpose of tree wrapping is to protect young trees from excessive exposure to the hot summer sun that can cause “sunscald” — the tree version of sunburn. If trunk wrapping is used, it should be removed after the first growing season, in early October as the sun’s rays start to diminish. This provides time for the bark to slowly adjust to the increased sunlight in the spring and summer.
Everyone benefits when someone plants a tree.