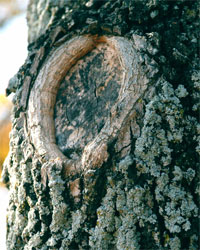
Prune To Branch Collar

Every gardener has to remove a few branches each winter. (Other times of year are also acceptable.) How you do the job will do a lot toward determining the tree’s subsequent health, vigor and even survival.
Almost every branch will widen at the point at which it attaches to another branch or to the main trunk. Think of it in comparison to the delta of a river where it enters the ocean. Foresters refer to that swelling as the branch "collar."
Decades ago, the advice was always to remove branches flush with the trunk. Those instructions, however, have been modified to suggest that we cut "almost flush," leaving a thin portion of the branch collar in place. How far away from the trunk you cut will be determined by the size of the branch. For most branches, however, you’ll want to be 1/8- to 1/4-inch away.
By making the cut roughly the thickness of your saw blade, you’ll actually be leaving a much smaller open wound, and that will lead to quicker healing. New bark will form in a roll around the circumference of the cut, gradually growing across it.
If you are removing a large branch (more than 2 inches in diameter), always follow the 3-Step approach to limb removal to prevent damage to the trunk. First, make an undercut 1/4 of the way into the branch from below. The undercut should be 12 to 15 inches out from the trunk. Second, 3 or 4 inches farther out on the limb you’re removing, cut through the branch from the top, down. As you complete the cut, the weight of the branch will begin to peel bark off the bottom of the branch. It will peel only back to the undercut. Third, cut the remaining stub back to the branch collar.
Pruning sealant is usually not advisable for pruning cuts. Research has shown that it tends to slow formation of new bark, although it does need to be used with oaks, especially those that must be pruned during spring, summer and fall. Apply a light dose of the aerosol spray to the oak cuts to prevent insects from carrying diseases into the wood.

