
Rose Cuttings – July, 2011
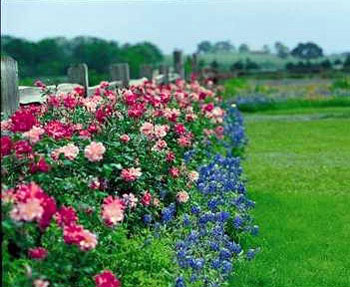
A hedge of ‘Marie Pavie’ at the Antique Rose Emporium.
Photos courtesy of Mike Shoup.
Rooting Roses – It’s in the Bag!
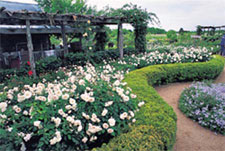
This landscape features multiple plantings of ‘Old Blush’ and a yaupon border.
Reprising a popular e-gardens article from years ago, Mike Shoup shares his rose rooting secrets.
Whether we are offered cuttings from a friend’s rose, find interesting varieties while traveling, or just want to increase numbers of our exciting roses, successful rooting of roses may be a daunting task. As a collector, grower and distributor of many old, rare or un-named varieties of roses, I have been exposed to dozens of methods of rooting cuttings that homeowners and nurserymen have invented in order to duplicate their roses. They range from large greenhouses with automated mist systems to a simple upside-down mason jar. One of the best methods, and ironically the easiest, is the use of a clear zip-lock-style plastic baggie.
So here is a method of rooting cuttings that rarely fails us – The Zip-Lock Bag Method. You will need only a few supplies: 1-gallon-size zip-lock baggies, all-purpose potting soil (not coarse screen), perlite, and root hormone (optional).
To start, fill the bottom of the baggie with 2 inches of moist potting soil and coarse perlite mixed in a one-to-one ratio. Perlite acts as an aerator, preventing the potting soil from compaction and over-saturation of water. (Air is a very important component of successful root formation.) Add only enough water to create a moist, not wet, medium. Properly moist medium will NOT drip if squeezed in your fist. (The greatest percentage of rooting failure, I have seen, has always been due to water-soaked medium not allowing good air exchange with the emerging roots from the cuttings.) You can place up to 10 three-inch cuttings in each baggie. (Cuttings taken from stems that have just bloomed are best.) Stem cuttings that are 3 to 4 inches long, containing two to three leaves, usually root well. Remove only the bottom leaf to allow the stem to easily enter the medium. You can dip your cuttings into rooting hormone containing IBA to aid in the speed and percentage of rooting. I have found that most cuttings will still root without it.
Correct placement of the baggie while roots develop is important. Direct sunlight can cook the un-rooted plants in the sealed baggie. Too little light won’t provide the energy the cuttings need to form roots. I have found that a northeast- or northwest-facing window sill offers excellent light for rooting. East- or west-facing windows are good as well, as long as some relief from the direct sun is offered. Shaded greenhouses are ideal, or shade under trees works well, provided the temperatures aren’t too cold. Optimum temperatures for rooting are from 55 to 85 F. To maintain the 100 percent humidity that the baggie environment provides, you may need to add up to 2 tablespoons of water every third or fourth day. Condensation on the baggie’s inside walls is a good sign that this “terrarium environment” is being maintained.
You can actually see roots emerging and, in three to five weeks, touching the bag’s sides. In five to seven weeks, the baggie can be opened from the top to start weaning the cuttings from their 100 percent humid environment. You will need to water more often as the newly rooted cuttings acclimate. In 10 to 18 weeks, rooted cuttings can be planted into small pots with regular potting soil or into protected areas of the garden.
This method of rooting works with many other types of plants as well. I have also found that some cuttings without leaves or even dormant hardwood cuttings will root, but at a lower percentage and at a slower pace.
About the author: Mike Shoup is the owner of the Antique Rose Emporium. Visit his company’s Brenham and San Antonio display gardens for endless ideas on landscaping with roses. To order roses online, visit www.weAREroses.com.