Transplanting Tips
If you have a tree or shrub that has outgrown its usefulness – if it’s just too large for its surroundings – winter is the prime time to dig and relocate it. Wait until you’ve had a hard freeze, and complete the task before buds start to swell in very early spring. However, it takes more than just good timing. It also requires knowledge of the root system and patience in doing the digging
You’ll want a sharpshooter spade with a reinforced handle. It will be your most-used transplanting tool if you have to penetrate one of the hardpan Texas clays, also as you cut through the tree’s roots. You’ll also need a round-headed shovel, a pair of pruning shears and possibly a pruning saw.
Determine the size of soil ball you’ll need to dig. Allow 14 inches of soil ball diameter for trees whose trunks are up to 1 inch in diameter. Increase it by 10 inches for a 2-inch tree, then add 8 to 10 inches for each additional inch of trunk diameter. If you’re moving a plant with more than one trunk such as a tree-form crape myrtle or clump oak, add their diameters together, then match the ball size up to the total trunk size.

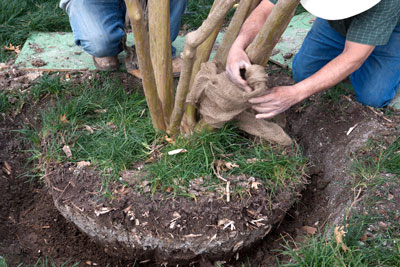
30-year-old crape myrtle had to be moved to a new location in the Sperry landscape. It survived the move and is thriving in its new and sunny home.
Do your transplanting at a time when the soil is moist, not wet and certainly not when it’s dry. Cut a narrow slit all the way around the root system at the point that will give you the correct size of ball. Your sharpshooter spade will cut most of the roots, but, when you encounter roots that are larger than 1/2- to 3/4-inch you’ll probably need your pruning shears or saw. Avoid jarring the soil ball as you attempt to cut the roots. Your prime goal will be to cut each root without loosening the soil that surrounds it. Continue working your way around the root ball cutting just as deeply as the ball is wide.
Once you have severed all the roots, you’ll want to dig an angled hole along one side of the ball. That hole will allow you to slide your sharpshooter almost horizontally to cut the taproot. If you’re digging a large tree or shrub, you will want to make a larger hole and taper its side, so that you can eventually slide the ball up and out of the hole.
Before you try to remove the soil ball from its current home, however, you’ll want to wrap it tightly with a piece of untreated burlap. Lean the plant slightly to one side, then push a folded piece of the burlap beneath it. Gently rock the soil ball back and forth enough that you can work the burlap up and equally around all sides of the ball. Use 10-penny box nails to pin the burlap tightly in place
Always lift the plant by its soil ball, never by grasping the trunk. One person can lift a smaller plant. Two people will be needed for a larger one. It may help to work a second piece of burlap or canvas beneath the ball to act as a cradle as you remove it from the hole. For plants that are larger than 2 inches in trunk diameter you will need to slide them up your ramp and onto the ground. You may need to configure a cradle of chains so that you can pull it up gently using a heavy garden tractor or pick-up with a trailer hitch.
Dig the new planting location before you move the plant to it. If you’re transplanting a large plant, dig a similar ramp to help you lower it back into the new site. Be especially careful, however, that you set the plant at exactly the same depth at which it was growing originally. For that reason you should not dig the new hole any deeper than the soil ball is tall. Loose soil in the bottom of a hole will compact from the weight of the tree, leaving the plant too deep and doomed. If you want to dig it slightly wider, however, that may make the job of setting the plant easier.
Once you have filled the hole halfway with the same soil you removed from it (Soil amendments are not necessary for plants which will develop extensive root systems.), water it slowly and deeply. Use a broomstick to push the soil in place and eliminate air bubbles, then fill it to the top and water again. Use the extra soil to create a berm to retain water.
Large plants that might tend to tilt in the winds should be staked and guyed firmly in place. Use heavy rags or scraps of old garden hose to keep the cables from rubbing through the trunk. Thin the plant by 30 to 40 percent to compensate for roots that were lost, and apply a liquid root stimulator to help it reestablish. Repeat the application of root stimulator monthly for the first year. It’s a good idea, too, to wrap the trunk to prevent sunscald and borer invasion.
Also from Neil's Notes...
Helping Plants Recover from Freeze Damage
In working with Texas gardeners for more than 45 years, I’ve seen a lot of bad winters do a lot of bad things to our plants. I’ve been through the ice storm of January 1, 1979. I’ve …

